Thursday, December 31, 2015

All Green Alike, Segue

Ok, going to wrap up the solo play-through and then transition into a PBEM recap.

Basically the Confederates pulled back across Bull Run, so it was looking like a victory for the Union except...

I had forgotten that one of the ways you score victory points is by killing the enemy.  The Union had made one last attack on Centreville before Longstreet withdrew, and the Confederates rolled high and the Union rolled low.  The ensuing casualties swung the balance of victory in favor of the South.

Which actually seemed like what would have been the case if this battle had been "real."  The North had suffered a lot of casualties but hadn't really driven the rebels back away from the Manassas area.

I've just begun a VASSAL game of the All Green Alike campaign game (scenario 6) with Paul Franklin, of The Noise Before Defeat fame.  Below is the map after three or four activations per side (I'm the Confederates).


Not sure what I'm doing really.  I'm sending my cavalry forward to try and disrupt the Union movement.  Anything else will have to wait for my reinforcements to show up, starting on turn 3.

Wednesday, October 28, 2015

All Green Alike part 3

Ok, going into the last turn, this was the overall situation:


In the center, the Confederates had captured Centreville but were in a precarious position.  While this scenario does not have any supply rules, clearly the South's spearhead was in danger of being cut-off.  Though with so many Union brigades taking part in the attack on the Confederate's left perhaps they thought there weren't enough troops left to make a serious effort to dislodge them from Centreville.


Still, Beauregard knows he can't stay there forever and will have to retreat eventually.  But he would love to blood the Union army before he withdraws back across Bull Run.


In the New Market-Gainesville area, the strong Union force had seen off several Confederate attacks and were in firm control of the situation.  Taking Gainesville and possibly pushing Southeast towards Manassas were well within their grasp.  However, the Confederate capture of Centreville might draw off much of their strength in order to either drive the CSA out or, more decisively, sweep in behind them and capture the bulk of the Southern army.


On the Confederate right, neither side had committed much.  Several Union regiments marched from the Washington vicinity to contest the crossings, but didn't really have the strength required to force the issue.  Their presence did draw out the Confederate cavalry, which made several interdicting attacks along the road from the District, and both sides seemed content with a standoff in this region.

Tuesday, September 8, 2015

All Green Alike part 2


The Union has pushed five brigades around the Confederate left.  They currently occupy Groveton and all but have Gainesville as well, both major objectives.  All of those units are at fatigue level four however, so they're done fighting for the day.


More accurately, they're done attacking for the day.  Johnston has moved the units under his command around from the right to reinforce the Confederate left.  If his men hurry, they could be in position to counterattack the Union brigades before the end of turn one.  More likely and the safer option would be for Johnston to concentrate near Gainesville and try to initiate an assault on Wilcox's brigade first thing during turn 2.  This would be enhanced by the arrival of Elzey's brigade by rail on the morning of July 20.

So far the Confederates have been forced to just react to what the Union has done.  Most of the initiative rolls have been won by the Union, which is the main reason they've managed to be so successful so far.  Even though most of the northern units are now too fatigued to continue operations, their superiority in numbers will make it difficult for the Confederates to dislodge them from Groveton/Gainesville.


One setback for the Union has been Miles' attempt to force a crossing at Mitchell's Ford.  Earlier in the turn Bonham's brigade crossed Bull Run at the ford but after suffering losses in attacking the Union holding troops decided discretion is the better part of valor and recrossed the river.  The Union saw this as an opportunity for a double-envelopment of most of the Confederate army.  However, Miles was unable to concentrate all of his command for the attack and instead conducted two piecemeal attacks which were bloodily repulsed.


Saturday, August 22, 2015

All Green Alike

All Green Alike is the name of the "bonus" game included with Stonewall Jackson's Way II, Multi-man Publishing's reprint of Avalon Hill's Stonewall Jackson's Way, the second game in the Great Campaigns of the American Civil War series.  The original game dealt with the campaign around the battle of Second Bull Run.  All Green Alike features the 1861 battle fought in northern Virginia.

Both "games" feature a number of scenarios, divided into basic and advanced.  The advanced ones (including the long campaign scenarios) incorporate the advanced rules, while the basic ones either eschew the advanced rules altogether or only use certain ones, and are generally shorter in duration.


Above is the set-up for the 3rd scenario, "McDowell's Opportunity," which is a hypothetical scenario that has the Federals attacking the Confederates at Manassas Junction two days before they did historically.

The game provides Force markers that you can use to keep big stacks off the main map, as shown below.


Each turn there are a number of initiative phases.  Both sides roll a die and the high roll wins the initiative (generally the Confederates win ties).  The initiative player either takes an action or passes the initiative to the opponent.  If both players pass the turn ends.

The basic actions a player can choose from are march, assault, and activate leader (you can also burn a railroad station or entrench).  Marching is both moving and attacking, though you can only attack with a single unit.  Assaults are the only way you can have more than unit attack at a time.  Activating a leader allows you to move several units at once, or at least sequentially, and these movements can also include an attack just like a regular march.  But you can't assault unless you initiate a "grand assault" with a leader activation.

The movement is random.  You roll a die and that's how many movement points you get (generally the Confederates always get a bonus).  These movement points are what you spend to attack when marching, and the cost of those attacks depends on what kind of attack you're launching.  I won't go into the details of combat, other than to say so far it seems to give reasonably accurate results.

Below is the general Union plan.  The divisions already engaged will try to march around the Confederate left, while additional Union troops to the Northeast will move up and hold the center, mainly Centreville, which is a Confederate objective, all the while trying to minimize their losses.


Thursday, August 20, 2015

ECW Cavalry

Finished the Warlord plastic boxed set of ECW cavalry finally.  I still can't believe that it was so easy to fix the humidity caused haze that I thought had screwed these figures permanently.


I painted half of the figures with red sashes to denote their allegiance to Charles, and the other half "tawny" in honor of Parliament.


I admit it's hard to tell the difference.  But that's kind of the point.

Sunday, August 9, 2015

Bridges and Buildings

Bought these buildings at Historicon, 10mm Southern Europe.


Airbrushed some basic colors on them, then just picked out the doors, shutters, and foliage.  After that brushed on some stain and then sprayed on a matte coat.

While I was painting the buildings I dug out these bridges that I've had for over a year now but had only undercoated.  Painted them up more or less the same.


Saturday, July 25, 2015

The First Battle of Newbury, English Civil War (part two)

Okay, regardless of how many figures I have, I've decided to do one half of the battle.  More accurately, I've decided the battle was fought in two halves (this really isn't true, but it suits my purposes), and I've decided to game the bottom half.  Basically, one part of the battle was fought among hedges and was a close quarters affair among the foot, while the other half was fought in open terrain among the cavalry.

Since I plan on using Carnage and Glory, trying to game the upper part of the battle doesn't make sense.  Also, I'm more interested in seeing how a sweeping cavalry attack by the cream of the King's army against Parliamentarian foot and cavalry would play out.

In other news, I've gone back through the Carnage and Glory rules and realized I wasn't deploying the cavalry correctly.  Well, in the program they were deployed correctly but the figures on the table weren't.  Basically the cavalry fights in a "fighting column," not in line.

Next up, I'll show some screens of how you build your army list in Carnage and Glory.

Sunday, June 28, 2015

Painting Update (Oh! The humidity of it all!)

Finished up my ECW cavalry more or less, all that's left is basing them.  But.., oh, the horror.  I guess it's been awhile (last Summer I reckon) since I had to varnish figures in hot and humid weather.  So I forgot that you shouldn't, you know, varnish figures in hot and humid weather and now I have 24 ECW cavalry troopers that were painted kinda nice but now look all cloudy.  Oh well.  I'm not doing them over again.  To me, they're just all dusty from being in the field for awhile.

Sunday, June 14, 2015

Won by the Sword (Anno Domini 1632 The Lion Goes South) Part 1

In Won by the Sword each player controls up to four "columns."  These can range in size anywhere from small cavalry detachments to armies.  They can be combined and split apart at will, but the players are limited to a total of four.

These columns are made up of infantry, cavalry, and artillery.  Though like I mentioned earlier you can have a column consisting of only one cavalry regiment.  Along with these basic units you also have various leaders and the baggage train.

Along with the columns each player has a number of garrisons in the various towns and fortresses on the map.


Here is the set up for the Lion Goes South scenario.  The columns are the little standees, and in the beginning of this scenario there are two Swedish columns (at the top of the map) and three Imperial/Bavarian columns (the Imperial army is at the bottom of the map, while the Bavarian ones are towards the middle and top).

In this game you accumulate victory points (vp) by defeating the enemy in pitched battles and conquering his cities/towns by siege.  The bigger the victory in a pitched battle and the bigger the city/town you conquer, the more vp you get.  Also, you get some vp from foraging in the enemies territory, which in this scenario is basically the Swedes get vp from foraging in the South and the Imperials/Bavarians get it for foraging in the North.

So..,  One more thing.  As far as pitched battles are concerned, a column can "offer battle," once it's activated, if it's in the same spot as an enemy column and spends a command point and a baggage point.  However, unless the attacker has played the Surprise Attack card, the defender doesn't have to fight.  He can refuse to fight and in doing so loses 3 vp.  In a pitched battle if you win a major victory the reward is 15 vp.  So...


At this point we see that a Swedish and Bavarian column have met at Augsburg.  What happened/happens?  Wait and see.

Saturday, May 9, 2015

Won by the Sword (Anno Domini 1632 The Lion Goes South) Intro


So, how did I wind up in this rabbit hole of the Thirty Years War?  From what I can remember in my previous life, I was browsing Audible.com for new audio book to listen to when I came across


I don't really remember why I chose this book, other than maybe it was the only pike and shot era book on Audible.  Anyway, I loved the book and it sparked a real and sudden interest in the Thirty Years War, and obviously an interest in games depicting that conflict.

If you've never heard of Won by the Sword by GMT games, one of the first things you'll come across looking at this game on the web is the negative feedback the game has received since it's release in Summer 2014.  Not so much negative feedback of the game itself, but the numerous issues with the rules and components.  This entry is not the place to list these, I'm just stating the obvious.  While I'm stating the obvious, I'll say the game is great.

"The Lion Goes South" is the first campaign scenario listed in the playbook.  It depicts Gustavus Adolphus's invasion of Bavaria in 1632.  At this point the war has already been raging for close to a decade and a half, and has outlasted many of the prominent figures from its early years (Mansfeld, Matthias, Christian of Brunswick, Gabriel Bethlen).  Historically the campaign culminated in the Battle of Lutzen, a major Protestant victory that cost Gustavus his life.  What will happen in my game?

Sunday, March 29, 2015

Painting Update


Above are the aforementioned soccer players mentioned in my previous post.  It's telling that I didn't bother to take more than one photo of them, so you're stuck with this dreadfully focused picture.  Still, overall I'm pleased with them, and even more pleased that I'm finished painting them.  In this picture they've been given an overcoat of Army Painter Strong Tone.  All that's left is to spray some matte varnish over them and they're ready for the field (I'm not going to texture and/or flock the bases).

The figures I really wanted to work on are my dismounted dragoons from Warlord Games' Pike and Shotte range.  Last Summer I painted up the mounted dragoons from the same boxed set, but used some of my musketeers for their dismounts when I ran my ECW game last December.  Now that the other half of the set are painted my musketeers can return to their original regiment.

The dismounts are metal figures, so no tedious assembling of plastic miniatures required.  As far as I can tell all eight figures are different poses, so that's nice.


In this photo they've been given my basic tabletop treatment, namely basic block painting of each individual "part" of the figure (to me a part is everything that is the same color, such as skin, hair, coat, pants, shoe, etc...).


 Here I've brushed on some Strong Tone.  This is how I paint miniatures and I'm very pleased with the results I get.  There are others who paint better than this, but the talent and effort required are beyond me.  Basic block painting and then a "dip" (I don't dip them but brush it on as I said) suits me fine.  Once this dries (48 hours or so)  I'll spray some matte varnish on them and then base them.  Stay tuned...

Saturday, March 28, 2015

Not Wanting to Paint is a Great Motivation

Specifically, not wanting to paint one particular kind of figure because you're eager to paint something else is a great way to get some painting done.

Sometimes I will start to paint a group of figures and then halfway through lose my desire and set them aside and move on to something else.  I think this is a terrible habit for several reasons, not least of which is my basement gets more and more unorganized with half-painted miniatures setting around.

Lately I hadn't been very motivated to paint anything.  Between work and domestic commitments my concentration levels were just shot.  Also, I think I needed a new project to work on.  After listening to the audio book Rebellion by Peter Ackroyd I plunged back into my English Civil War obsession, wanting to flesh out my 28mm figure collection.  Specifically, I want to build up my forces to the point that I can field the armies that fought at First Newbury (see my last post).

But, on my painting table were 22 soccer players, half of which were painted in Liverpool's colors, the others with only their flesh colors complete.  Also, there were five gladiators that I had cleaned but hadn't undercoated that I wanted to add to my Spartacus board game.

At first I was really only motivated to paint the gladiators.  There were only five of them and once complete I could take them up to the local game store and get some use out of them since everyone I play board games with is generally up for a game of Spartacus.

So a couple of nights ago I went downstairs at around 11pm, with my only intention to paint the armored parts of the gladiators.  The soccer players were sitting there on their craft sticks, staring at me accusingly.  I had abandoned them.  I wasn't all that into painting the gladiators; the soccer players, who I doubt I will use anytime in the near future if at all, were on the verge of being trundled into a bin, where they might have remained forever, or until I needed room in the bin and threw them away.

Realizing how ridiculous I was being, not to mention wasteful, I decided there and then that the other players were going to be Everton.  Before I knew it, all 22 players were completely painted.  Granted, it was a real rush job, very unlike the session I had tonight painting ECW dragoons.  But they don't look that bad, and more importantly, they're done.  And now that they're done, I'm actually motivated to use them in a game.

Whether that's a soccer minis game or a hooligan skirmish game remains to be seen...

Sunday, March 22, 2015

The First Battle of Newbury, English Civil War (part one)

This series of posts will serve almost as a thought exercise as I prepare a wargame based on the First Battle of Newbury using the Carnage and Glory 2 computer moderated rules system.

So why First Newbury?  No particular reason, other than I was looking for an early First English Civil War battle that was relatively large.  The prior games I've run were smaller, and one was hypothetical, so now I want to tackle something bigger and historical.

 
The above map is from the British Civil Wars, Commonwealth and Protectorate 1638-1660 website, which seems like a pretty good resource.  First thought I had when I looked at it was, this doesn't look so bad!  Less than a dozen regiments per side!

Well...  Upon further reading each of the units denoted on the map are brigades, each consisting of roughly three or four regiments per brigade.  That's fairly big.  So, time to downsize.

There are several ways to go about this.  I could just make up the order of battle with each unit being a brigade instead of a regiment.  This could be problematic since the Carnage and Glory software isn't designed that way.  It organizes the regiments into brigades which I believe effects how well soldiers from one brigade respond to officers of different brigades as opposed to their own.  Also, the ground scale would no longer be accurate, though that might not be apparent in the game.

Biggest reason I wouldn't want to "upscale" the scenario that way is I would lose much of the detail.

Another way to go is to do the entire order of battle for First Newbury, but only run a scenario for a portion of the battle.  This is much better to me since I wouldn't be "cheating" the system, and I can actually run several games featuring different parts of the battle.

To start I think I'm going to do the mostly cavalry action on the southern half of the battlefield.  For one thing depicting the northern half will require me to model the disruptive terrain of hedges and narrow lanes, while the southern part was relatively open.

With that decided, the next issue is whether I actually have enough figures to do one half or even one third of the battle.

Monday, January 26, 2015

Blood and Roses 1st St. Albans part 2

Up front I'll say I'm still not sure if I like this game.  Admittedly I LOVE this game, as in I love playing out battles from the Wars of the Roses.  I'm still not sure how much I like the games mechanics, which I assume are similar to the other games in the Men of Iron series from GMT (the other games being Men of Iron and Infidel).

The cleverest mechanic and one I'm going to steel (get it?) for miniatures play is the activation system.  The way it works is whoever goes first in the scenario gets a "free activation," which means he can activate any one of his "battles"/divisions, his entire army for strategic movement (in the St. Albans scenario the armies start the game too close together to use this), or the army's standard.  Once he's completed that activation, he may attempt to activate another single battle, but he has to make a die roll based on the leadership quality of the battle's commander and he can't activate the same battle that just activated, unless that's the only battle left in his army.  If he succeeds he may activate the battle, and once finished make another attempt to activate another battle just like before, only each subsequent die roll becomes more difficult since you add one to each attempt.  You're trying to roll equal to or less than the commanders leadership with a d10, with most commanders being in the 3-4 range.  Once you fail this roll or pass your opponent gets a free activation as above and goes from there just like the starting player.

Why would you pass?  If the scenario has a time requirement, wherein one side has to achieve victory in a certain number of turns, the other player can pass and advance the time by one.  1st St. Albans has this with the Yorkists having to achieve their victory conditions before time expires.

The movement is pretty straightforward and similar to other hex and counter games.  Each scenario has special rules governing the unique terrain where the historical battle was fought (such as the ditch that surrounds St. Albans).

The combat is where I'm not completely sold.  When your units move into combat with the enemy, you don't have to attack.  But, if you do you have to attack all the enemy units you're in contact with.

So in the above photo if the Lancastrians (red) wanted to attack the Yorkists, that single unit would have to attack both of the enemy units that it's in contact with.  I like this and it feels fairly realistic in that units can't single out enemies while ignoring others that are right next to them.

What I'm not sure about is how you actually do the combat.  The game has a lot of modifiers for the attack roll, around a dozen or so.  This is a personal pet peeve of mine that I don't like having to add and subtract numerous modifiers.  I'm not saying it's horrible, it's just doing a lot of something that I generally don't like.  But it's probably a testament to how good the game is in that I seem to enjoy playing in spite of this.

Next up I'm going to tackle one of the larger scenarios.  2nd St. Albans maybe?

Sunday, January 4, 2015

Blood and Roses: 1st St. Albans

Blood and Roses is the third game in GMT's Men of Iron series and covers several battles of the English Wars of the Roses.  1st St. Albans is the smallest scenario in the game and seems to provide an excellent tutorial to the system.  In this post I will present a narrative description of the game I played, while in a subsequent post I will go more into the game's mechanics.

Historically the battle was the culmination of a long running feud between Richard Plantagenet, the Duke of York, and Edmund Beaufort, the Duke of Somerset.  York had largely been denied what he thought was his rightful place in England's political apparatus, and he and his ally Richard Neville, the Earl of Warwick, feared that with Somerset's resumption of his position as "Protector" they would be cast as traitors to the crown and they and their families ruined.

Henry VI and Somerset (along with Humphrey Stafford, Duke of Buckingham; Henry Percy, Earl of Northumberland; and Thomas Clifford, Baron de Clifford) and their retainers were marching to Leicester for a meeting of England's nobles.  York and Warwick sought to intercept the King and make their case before the council meeting was held.  Most accounts have the Yorkists initiating hostilities, with the Lancastrians expecting a peaceful resolution.  A flanking maneuver by Warwick routed the Lancastrian forces and captured the King.

What follows is a description of the scenario in Blood and Roses and the outcome of a game I played solitaire.


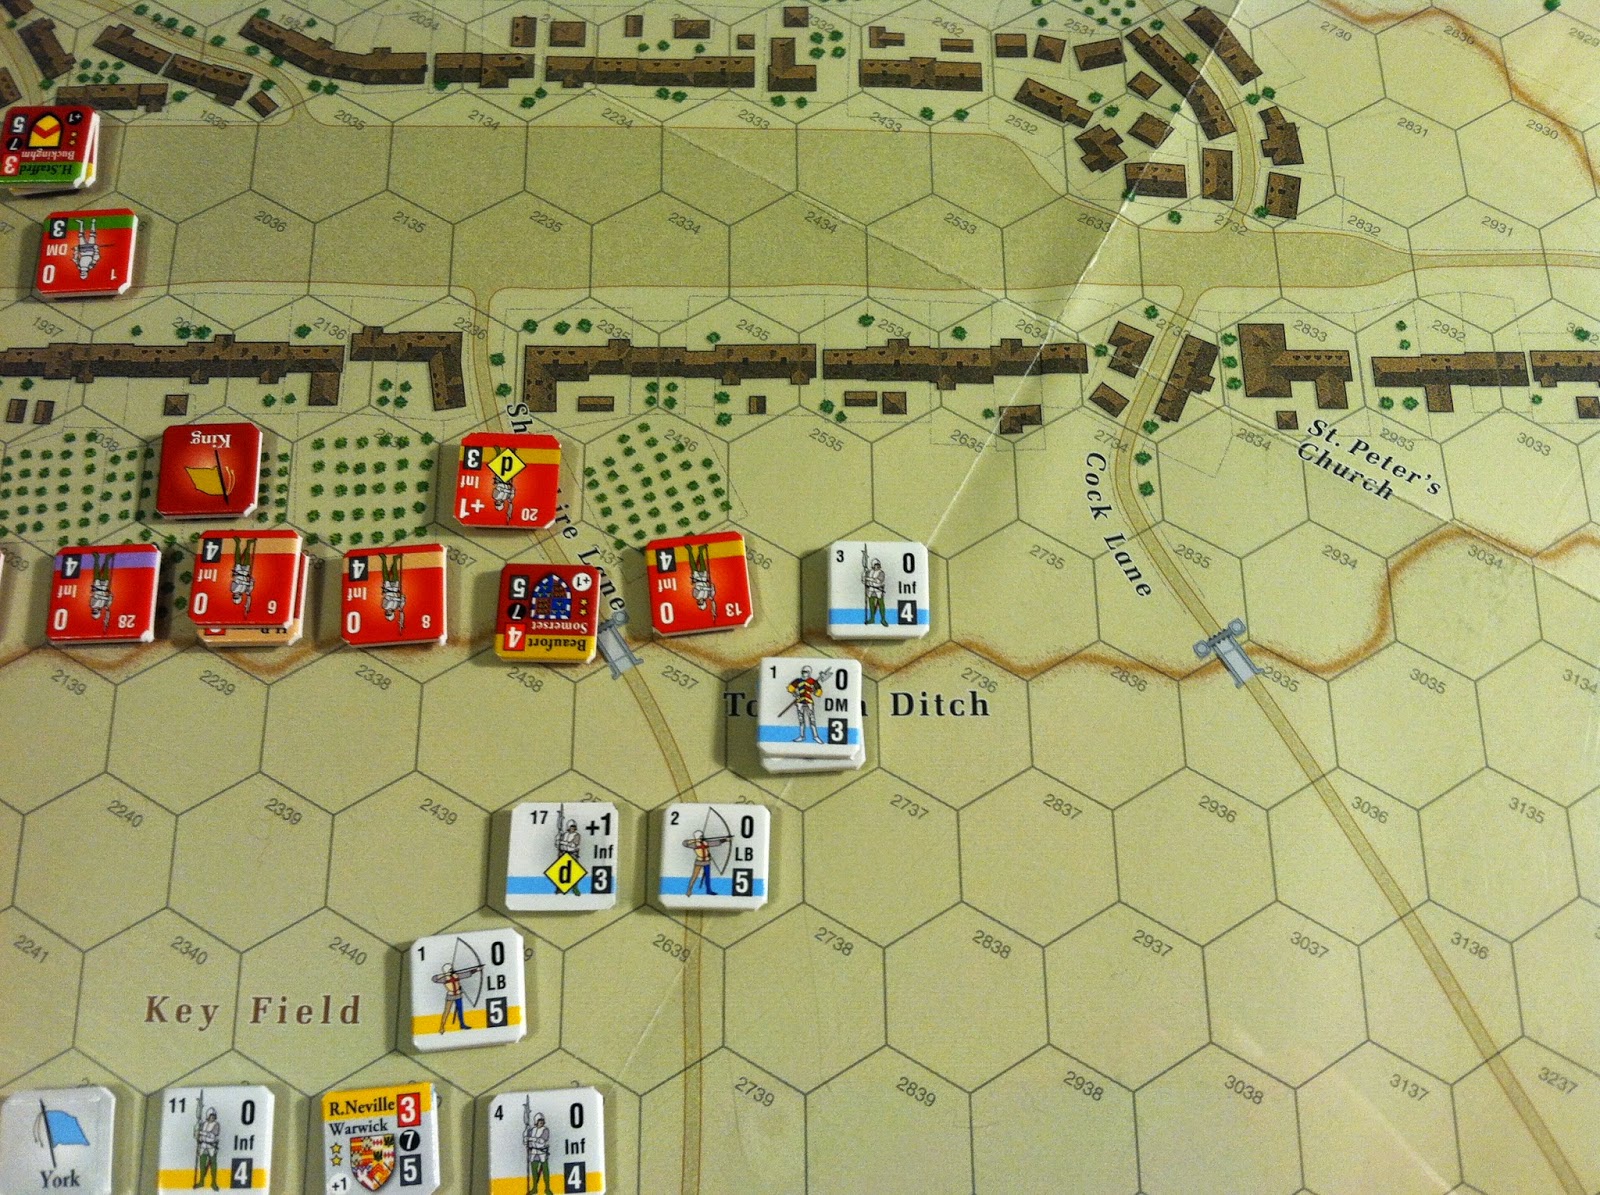
Here we see the Yorkist right "battle" (typically armies were divided into battles, usually left, right, and center), under the command of the Duke of York attacking the Lancastrian right under the command of Duke of Somerset.  The Lancastrians (red counters) were holding the bridges that spanned the Tonman Ditch which provided the only easy access to the town of St. Albans.  York's longbowmen softened up the Lancastrian infantry before the Yorkist infantry engaged.  Instead of trying to storm across the bridge, the Yorkists crossed the Ditch with their infantry in a flanking maneuver as their dismounted men-at-arms attacked straight into the Lancastrian footmen.


Here we see that York has pressed his attack, with all but one of his units having crossed the Ditch and are now flanking the Lancastrian line.  Additionally, Warwick's center battle has advanced and is threatening the Lancastrian front.


Responding to the attack on their left, the Lancastrian right battle under the command of Clifford have pulled back from the Ditch and are attempting to take up defensive positions in the town near the King.  However, the Yorkist left under the command of Richard Neville, the Earl of Salisbury, are pressing home an attack of their own.  One of the Lancastrian infantry units has been forced to retire to the Lancastrian standard (the flag labeled "King" isn't the actual king, rather it denotes the location of the Lancastrian standard which is used for rallying purposes) as the Yorkist left flank attack now appears to be the most dangerous.  Henry VI is located with Buckingham, behind the man-at-arms and Clifford.


The Yorkists have decided to concentrate their efforts against the Lancastrian right, though by now the King's lines are disintegrating.  Their last hope is to barricade themselves in the town and hope for a miracle.


The King's final stand!  Henry VI, along with Clifford, Buckingham, and their retainers hold up in a house adjacent to the Abbey in a final fight against Salisbury's men.  To make matters worse, York's soldiers are advancing from the other direction.  The end must be near...


And there you have it.  In the melee Henry VI is cut down, while Clifford and Buckingham escape to fight (or negotiate) another day.  Presumably with Henry's death the Duke of York would seize the crown while Somerset and his allies flee England.